一、目的
在使用CentOS6.3版本linux系统的时候,发现根目录(/)的空间不是很充足,而其他目录空间有很大的空闲,所以本文主要是针对现在已有的空间进行调整。首先,先来查看一下系统的空间分配情况:
1
2
3
4
5
6
7
8
| [root@CentOS-78 /]# df -h
Filesystem Size Used Avail Use% Mounted on
/dev/mapper/vg_centos-lv_root
50G 14G 34G 30% /
tmpfs 1.9G 0 1.9G 0% /dev/shm
/dev/sda1 485M 37M 423M 8% /boot
/dev/mapper/vg_centos-lv_home
404G 670M 382G 1% /home |
下面的详细步骤部分将从vg_centos-lv_home分区下取出100G的空间添加到/vg_centos-lv_root分区上去。
二、详细步骤
1、卸载vg_centos-lv_home分区
1
2
3
4
5
6
7
8
9
10
11
12
| [root@CentOS-78 /]# umount /home
[root@CentOS-78 /]# df -h
Filesystem Size Used Avail Use% Mounted on
/dev/mapper/vg_centos-lv_root
50G 14G 34G 30% /
tmpfs 1.9G 0 1.9G 0% /dev/shm
/dev/sda1 485M 37M 423M 8% /boot
[root@CentOS-78 /]# resize2fs -p /dev/mapper/vg_centos-lv_home 282G
resize2fs 1.41.12 (17-May-2010)
Please run 'e2fsck -f /dev/mapper/vg_centos-lv_home' first. |
这一步设定vg_home-lv_home大小没有成功,系统提示我们先运行下面的命令,操作如下:
1
2
3
4
5
6
7
8
9
10
11
12
13
14
15
16
17
18
19
20
21
22
23
24
25
26
27
28
29
30
31
32
33
34
35
36
37
38
39
| [root@CentOS-78 /]# e2fsck -f /dev/mapper/vg_centos-lv_home
e2fsck 1.41.12 (17-May-2010)
Pass 1: Checking inodes, blocks, and sizes
Pass 2: Checking directory structure
Pass 3: Checking directory connectivity
Pass 4: Checking reference counts
Pass 5: Checking group summary information
/dev/mapper/vg_centos-lv_home: 1386/26836992 files (0.9% non-contiguous), 1855856/107344896 blocks
[root@CentOS-78 /]# resize2fs -p /dev/mapper/vg_centos-lv_home 282G
resize2fs 1.41.12 (17-May-2010)
Resizing the filesystem on /dev/mapper/vg_centos-lv_home to 73924608 (4k) blocks.
Begin pass 2 (max = 43)
Relocating blocks XXXXXXXXXXXXXXXXXXXXXXXXXXXXXXXXXXXXXXXX
Begin pass 3 (max = 3276)
Scanning inode table XXXXXXXXXXXXXXXXXXXXXXXXXXXXXXXXXXXXXXXX
Begin pass 4 (max = 266)
Updating inode references XXXXXXXXXXXXXXXXXXXXXXXXXXXXXXXXXXXXXXXX
The filesystem on /dev/mapper/vg_centos-lv_home is now 73924608 blocks long.
[root@CentOS-78 /]# mount /home
[root@CentOS-78 /]#
[root@CentOS-78 /]# df -h
Filesystem Size Used Avail Use% Mounted on
/dev/mapper/vg_centos-lv_root
50G 14G 34G 30% /
tmpfs 1.9G 0 1.9G 0% /dev/shm
/dev/sda1 485M 37M 423M 8% /boot
/dev/mapper/vg_centos-lv_home
278G 663M 263G 1% /home
[root@CentOS-78 /]#
[root@CentOS-78 /]# lvreduce -L 282G /dev/mapper/vg_centos-lv_home
WARNING: Reducing active and open logical volume to 282.00 GiB
THIS MAY DESTROY YOUR DATA (filesystem etc.)
Do you really want to reduce lv_home? [y/n]: y
Reducing logical volume lv_home to 282.00 GiB
Logical volume lv_home successfully resized
[root@CentOS-78 /]# |
查看一下lv目前的情况
1
2
3
4
5
6
7
8
9
10
11
12
13
14
15
16
17
18
19
20
21
| [root@CentOS-78 /]# vgdisplay
--- Volume group ---
VG Name vg_centos
System ID
Format lvm2
Metadata Areas 1
Metadata Sequence No 5
VG Access read/write
VG Status resizable
MAX LV 0
Cur LV 3
Open LV 3
Max PV 0
Cur PV 1
Act PV 1
VG Size 465.27 GiB
PE Size 4.00 MiB
Total PE 119109
Alloc PE / Size 86472 / 337.78 GiB
Free PE / Size 32637 / 127.49 GiB
VG UUID 1k4ooN-RFV9-uyf1-uMYf-aERG-YaGs-ZNoSD6 |
Free PE / Size指定的应该是现在可在分配的空间。
4、增加vg_centos-lv_root分区的大小
将可用的空间添加到vg_centos-lv_root分区上面:
1
2
3
4
5
6
7
8
9
10
11
12
| [root@CentOS-78 /]# lvextend -L +127.40G /dev/mapper/vg_centos-lv_root
Rounding up size to full physical extent 127.40 GiB
Extending logical volume lv_root to 177.40 GiB
Logical volume lv_root successfully resized
[root@CentOS-78 /]#
[root@CentOS-78 /]# resize2fs -p /dev/mapper/vg_centos-lv_root
resize2fs 1.41.12 (17-May-2010)
Filesystem at /dev/mapper/vg_centos-lv_root is mounted on /; on-line resizing required
old desc_blocks = 4, new_desc_blocks = 12
Performing an on-line resize of /dev/mapper/vg_centos-lv_root to 46504960 (4k) blocks.
The filesystem on /dev/mapper/vg_centos-lv_root is now 46504960 blocks long. |
5、再次查看分区大小
1
2
3
4
5
6
7
8
| [root@CentOS-78 /]# df -h
Filesystem Size Used Avail Use% Mounted on
/dev/mapper/vg_centos-lv_root
175G 14G 153G 9% /
tmpfs 1.9G 0 1.9G 0% /dev/shm
/dev/sda1 485M 37M 423M 8% /boot
/dev/mapper/vg_centos-lv_home
278G 663M 263G 1% /home |
我们发现vg_centos-lv_root分区的空间已经增加了125G,之所以比lv_home减少的空间要多25G主要是由于我们把系统所有的可用的空间都加在了lv_root分区。
三、所遇到的问题
1、在卸载/home目录的时候失败
可先执行如下fuser命令,然后再umount即可:
1
2
| [root@CentOS-78 /]# fuser -m /home
[root@CentOS-78 /]# |
2、设定完lv_home的大小,再次mount该分区时,发现用df命令无法看到给分区,此时只要在mount一次即可
3、在设定lv_root的大小时,不要把Free PE / Size的空间全部都用上,这很可能会出现Free PE空间不足的现象,建议保留一点Free PE的空间。
最近在研究一些深度学习框架和大数据可视化的应用,经常会编译一些文件,而yum的默认地址下载太慢,所以用国内比较稳定的阿里云源。
参考
http://mirrors.aliyun.com/help/centos?spm=5176.bbsr150321.0.0.d6ykiD
话不多说,上命令
1、备份
mv /etc/yum.repos.d/CentOS-Base.repo /etc/yum.repos.d/CentOS-Base.repo.backup
2、下载新的CentOS-Base.repo 到/etc/yum.repos.d/
CentOS 5
wget -O /etc/yum.repos.d/CentOS-Base.repo http://mirrors.aliyun.com/repo/Centos-5.repo
CentOS 6
wget -O /etc/yum.repos.d/CentOS-Base.repo http://mirrors.aliyun.com/repo/Centos-6.repo
CentOS 7
wget -O /etc/yum.repos.d/CentOS-Base.repo http://mirrors.aliyun.com/repo/Centos-7.repo
3、之后运行yum makecache生成缓存
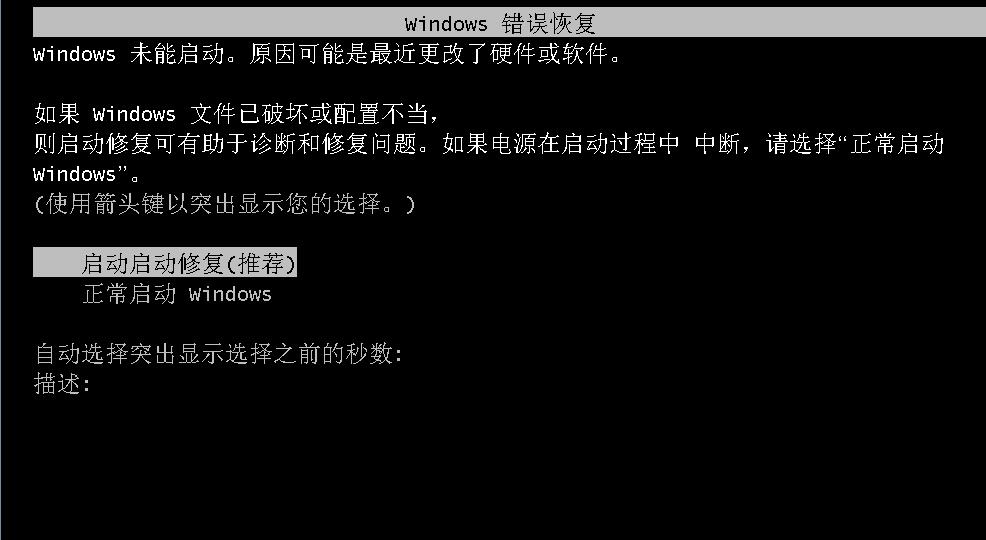
解决断电或者其他原因导致系统默认自动进入修复模式,导致系统无法正常开机。

桌面右键新建一个文档文本,双击打开文件新建文本文档,
复制以下命令到文本里面!
bcdedit /set {default} bootstatuspolicy ignoreallfailures
bcdedit /set {current} recoveryenabled No
在界面的左上角点击“文件”“另存为”,打开保存界面。在“保存格式”一行中选择“所有文件”;再把“文件名称”改为“XXXX.bat”的格式,保存为一个可运行的bat文件
然后桌面就出现了一个bat文件,只要双击文件就可以运行,系统窗口会一闪而过,接着可以删除该bat文件,电脑以后就不会出现修复模式了。
HAProxy 表示 High Availability Proxy ,是开源的负载均衡与代理软件。GitHub,Imgur,Instagram,Twitter 都在用它,阿里云的 SLB 服务也是基于 HAProxy 做的。
虚拟机
balancer:192.168.33.60
web1:192.168.33.61
web2:192.168.33.62
database:192.168.33.63
安装 HAProxy
yum install haproxy -y
systemctl start haproxy
systemctl enable haproxy
HAProxy 配置
HAProxy 的配置文件分成了两大部分:
Global:设置进程范围的参数。
Proxies:defaults,listen,frontend,backend …
HAProxy 配置:Global
复制默认的 haproxy.cfg 文件:
cd /etc/haproxy; sudo cp haproxy.cfg haproxy.cfg.bak
打开 haproxy.cfg :
vi /etc/haproxy/haproxy.cfg
你会看到这里已经定义了两个部分,global 还有 defaults 。
在 defaults 里面,查找:
mode http
option httplog
把 http 替换成 tcp :
mode tcp
option tcplog
HAProxy 配置:Proxies
frontend www
bind 192.168.33.60:80
default_backend web-backend
然后继续添加:
backend web-backend
balance roundrobin
mode tcp
server web1 192.168.33.61:80 check
server web2 192.168.33.62:80 check
重启 HAProxy
systemctl restart haproxy
在给nginx 配置了一个超长的域名后,通过 /usr/local/nginx/sbin/ngnix -t 检查配置文件时出现一下错误:
. 代码如下:
could not build the server_names_hash, you should increase server_names_hash_bucket_size: 32
解决办法是在nginx的配置文件的http段中增加如下配置:
. 代码如下:
server_names_hash_bucket_size 64;
如果已经存在,需要加大后面的数值,注意:该数值是32的倍数为宜。
下面是nginx官方文档:
. 代码如下:
如果定义了大量名字,或者定义了非常长的名字,那可能需要在http配置块中使用server_names_hash_max_size和server_names_hash_bucket_size指令进行调整。server_names_hash_bucket_size的默认值可能是32,或者是64,或者是其他值,取决于CPU的缓存行的长度。如果这个值是32,那么定义“too.long.server.name.example.org”作为虚拟主机名就会失败,而nginx显示下面错误信息:
could not build the server_names_hash,
you should increase server_names_hash_bucket_size: 32
出现了这种情况,那就需要将指令的值扩大一倍:
http {
server_names_hash_bucket_size 64;
…
如果定义了大量名字,得到了另外一个错误:
could not build the server_names_hash,
you should increase either server_names_hash_max_size: 512
or server_names_hash_bucket_size: 32
那么应该先尝试设置server_names_hash_max_size的值差不多等于名字列表的名字总量。如果还不能解决问题,或者服务器启动非常缓慢,再尝试提高server_names_hash_bucket_size的值。
HKEY_LOCAL_MACHINE
– SOFTWARE
– – Microsoft
– – – Windows NT
– – – – CurrentVersion
– – – – – Windows
USERProcessHandleQuota:项设置用户句柄数量,默认值同样为2710(16进制)/10000(10进制),该值的允许范围为 200 ~ 18000 ,将其调整为更多的数值。同样地,对于具有2GB或更多物理内存的系统,不妨将用户句柄数直接设置为上限 18000(10进制);
对于Windows 7、Windows 8操作系统,可以在图形界面中通过输入序列号,从低版本直接升级到高的版本,例如从Windows 7家庭版升级到专业版或旗舰版。而对于Windows Server 2008、Windows Server 2012来说,则可以通过dism命令实现类似的功能。
Windows Server 2012发布后,我依次将单位的服务器升级或全新安装到了Windows Server 2012标准版或企业版(为了对比不对版本的功能特意安装)。现在想将标准版升级到数据中心版,步骤如下。
进入命令提示窗口,执行dism /online /get-targeteditions,查看当前系统可以升级的版本,显示可以升级到datacenter
显示可以升级的版本
(3)执行如下命令升级:
dism /online /set-edition:ServerDatacenter /productkey:7H6M3-4N78W-RFFKJ-H9KPW-K2C2M /AcceptEula
升级到datacenter
执行命令之后,重新启动计算机。
(4)再次进入系统,执行winver可以看到,当前为数据中心版。
Ubuntu14.04系统中,因为误操作导致管理员密码丢失或无效,并且忘记root密码,此时无法进行任何root/sudo权限操作。可以通过GRUB重新设置root密码,并恢复管理员账户到正常状态。
启动系统,显示GRUB选择菜单(如果默认系统启动过程不显示GRUB菜单,则在系统启动时需要长按[Shift]键,显示GRUB界面),选择Advanced options for Ubuntu,按下[Enter]进入,选择recovery mode,不要按下回车键。
按下[e]键进入命令编辑状态,到 linux /boot/vmlinuz-……. ro recovery nomodeset 所在行,将“ro recovery nomodeset”替换为“quiet splash rw init=/bin/bash”,按下[F10]或者[Ctrl+x]重启系统。
此时以root身份启动一个可读写的bash,直接使用命令passwd更改root密码,然后按下[Ctrl+Alt+Delete]重启系统。
系统启动后进入字符终端[Ctrl+Alt+F<1...6>],使用root账户和密码登录系统,然后进行恢复管理账户状态操作。(图形界面终端为[Ctrl+Alt+F<7>])
linux scp和rsyc限速传输
一、scp限速1M
scp -l 1000 vps12.com.tar.gz root@192.168.1.2:/root
#此时的传输速率就是1M/8=100KB左右!经测试,如果数值在3000大约跑近4mbps。
二、rsync是(限制为 100k Bytes/s):
rsync -auvzP–bwlimit=100 本地的文件 远程的文件
参数说明:
v:详细提示
a:以archive模式操作,复制目录、符号连接,等价于 -rlptgoD 。
z:压缩
u:只进行更新,防止本地新文件被重写,注意两者机器的时钟的同时
P:是综合了–partial –progress两个参数,
所以此时的rsync支持了断点续传
机房之间传文件一般都担心带宽占用太多,特别是在共用带宽的情况下。常用的两个软件都可以限速:
scp可以加上 -l 参数:
引用
-l limit
Limits the used bandwidth, specified in Kbit/s.
rsync可以加上 –bwlimit 参数
引用
-i, –itemize-changes output a change-summary for all updates
–log-format=FORMAT output filenames using the specified format
–password-file=FILE read password from FILE
–list-only list the files instead of copying them
–bwlimit=KBPS limit I/O bandwidth; KBytes per second
–write-batch=FILE write a batched update to FILE
–only-write-batch=FILE like –write-batch but w/o updating dest
由于ssh的安全性问题。最安全的办法就是限制指定ip能访问。允许指定的ip访问ssh服务最为有效。
操作如下:
第一步:
vim /etc/hosts.allow
加入以下:
sshd:10.2.2.2:allow
sshd:192.168.1.0/255.255.255.0:allow
ps:10.2.2.2是指定单个ip访问,192.168.1.1-255是指定这个段访问。同理,自己改一下ip即可套用。
第二步:
vim /etc/hosts.deny
加入以下:
sshd:ALL
第三步:
/etc/init.d/networking restart
重启网络服务生效。

