存档

2015年1月 的存档

XAMPP php版本历史

2015年1月18日 没有评论

XAMPP版本历史如图

http://code.stephenmorley.org/articles/xampp-version-history-apache-mysql-php/

XAMPP Apache MySQL PHP 5 PHP 4
1.8.1 2.4.3 5.5.27 5.4.7
1.8.0 2.4.2 5.5.25a 5.4.4
1.7.7 2.2.21 5.5.16 5.3.8
1.7.5 2.2.21 5.5.15 5.3.8
1.7.4 2.2.17 5.5.8 5.3.5
1.7.3 2.2.14 5.1.41 5.3.1
1.7.2 2.2.12 5.1.37 5.3.0
1.7.1 2.2.11 5.1.33 5.2.9
1.7.0 2.2.11 5.1.30 5.2.8
1.6.8 2.2.9 5.0.67 5.2.6 4.4.9
1.6.7 2.2.9 5.0.51b 5.2.6 4.4.8
1.6.6a 2.2.8 5.0.51a 5.2.5 4.4.8
1.6.6 2.2.8 5.0.51 5.2.5 4.4.8 (RC2)
1.6.5 2.2.6 5.0.51 5.2.5 4.4.7
1.6.4 2.2.6 5.0.45 5.2.4 4.4.7
1.6.3a 2.2.4 5.0.45 5.2.3 4.4.7
1.6.3 2.2.4 5.0.54 5.2.3 4.4.7
1.6.2 2.2.4 5.0.41 5.2.2 4.4.7
1.6.1 2.2.4 5.0.37 5.2.1 4.4.6
1.6.0a 2.2.4 5.0.33 5.2.1 4.4.5
1.6.0 2.2.3 5.0.33 5.2.1 4.4.5

分类: Linux 标签: , , ,

centos 6.2 更新报错解决 yum you could try using skip broken to work around the problem

2015年1月14日 没有评论

centos 6.2 更新报错解决 yum you could try using skip broken to work around the problem

yum update
Loaded plugins: aliases, changelog, downloadonly, kabi, presto, refresh-
: packagekit, security, tmprepo, verify, versionlock
Loading support for Red Hat kernel ABI
adobe-linux-x86_64 | 951 B 00:00
google-chrome | 951 B 00:00 …
sl | 3.2 kB 00:00
sl-security | 1.9 kB 00:00
Setting up Update Process
Resolving Dependencies
–> Running transaction check
—> Package python-qpid.noarch 0:0.12-1.el6 will be updated
—> Package python-qpid.noarch 0:0.14-11.el6_3 will be an update
—> Package python-qpid-qmf.x86_64 0:0.12-6.el6 will be updated
—> Package python-qpid-qmf.x86_64 0:0.14-14.el6_3 will be an update
—> Package qpid-cpp-client.x86_64 0:0.12-6.el6 will be updated
–> Processing Dependency: libqpidclient.so.5()(64bit) for package: matahari-agent-lib-0.4.4-11.el6.x86_64
–> Processing Dependency: libqpidclient.so.5()(64bit) for package: matahari-network-0.4.4-11.el6.x86_64
–> Processing Dependency: libqpidclient.so.5()(64bit) for package: matahari-sysconfig-0.4.4-11.el6.x86_64
–> Processing Dependency: libqpidclient.so.5()(64bit) for package: matahari-service-0.4.4-11.el6.x86_64
–> Processing Dependency: libqpidclient.so.5()(64bit) for package: matahari-host-0.4.4-11.el6.x86_64
–> Processing Dependency: libqpidcommon.so.5()(64bit) for package: matahari-network-0.4.4-11.el6.x86_64
–> Processing Dependency: libqpidcommon.so.5()(64bit) for package: matahari-host-0.4.4-11.el6.x86_64
–> Processing Dependency: libqpidcommon.so.5()(64bit) for package: matahari-sysconfig-0.4.4-11.el6.x86_64
–> Processing Dependency: libqpidcommon.so.5()(64bit) for package: libvirt-qmf-0.3.0-4.el6.x86_64
–> Processing Dependency: libqpidcommon.so.5()(64bit) for package: matahari-agent-lib-0.4.4-11.el6.x86_64
–> Processing Dependency: libqpidcommon.so.5()(64bit) for package: matahari-service-0.4.4-11.el6.x86_64
—> Package qpid-cpp-client.x86_64 0:0.14-22.el6_3 will be an update
—> Package qpid-cpp-client-ssl.x86_64 0:0.12-6.el6 will be updated
—> Package qpid-cpp-client-ssl.x86_64 0:0.14-22.el6_3 will be an update
—> Package qpid-cpp-server.x86_64 0:0.12-6.el6 will be updated
—> Package qpid-cpp-server.x86_64 0:0.14-22.el6_3 will be an update
—> Package qpid-cpp-server-ssl.x86_64 0:0.12-6.el6 will be updated
—> Package qpid-cpp-server-ssl.x86_64 0:0.14-22.el6_3 will be an update
—> Package qpid-qmf.x86_64 0:0.12-6.el6 will be updated
—> Package qpid-qmf.x86_64 0:0.14-14.el6_3 will be an update
—> Package qpid-tools.noarch 0:0.12-2.el6 will be updated
—> Package qpid-tools.noarch 0:0.14-6.el6_3 will be an update
—> Package ruby-qpid-qmf.x86_64 0:0.12-6.el6 will be updated
—> Package ruby-qpid-qmf.x86_64 0:0.14-14.el6_3 will be an update
–> Finished Dependency Resolution
Error: Package: matahari-host-0.4.4-11.el6.x86_64 (@anaconda-ScientificLinux-201202061444.x86_64)
Requires: libqpidclient.so.5()(64bit)
Removing: qpid-cpp-client-0.12-6.el6.x86_64 (@anaconda-ScientificLinux-201202061444.x86_64)
libqpidclient.so.5()(64bit)
Updated By: qpid-cpp-client-0.14-22.el6_3.x86_64 (sl-security)
Not found
Error: Package: matahari-sysconfig-0.4.4-11.el6.x86_64 (@anaconda-ScientificLinux-201202061444.x86_64)
Requires: libqpidclient.so.5()(64bit)
Removing: qpid-cpp-client-0.12-6.el6.x86_64 (@anaconda-ScientificLinux-201202061444.x86_64)
libqpidclient.so.5()(64bit)
Updated By: qpid-cpp-client-0.14-22.el6_3.x86_64 (sl-security)
Not found
Error: Package: matahari-service-0.4.4-11.el6.x86_64 (@anaconda-ScientificLinux-201202061444.x86_64)
Requires: libqpidcommon.so.5()(64bit)
Removing: qpid-cpp-client-0.12-6.el6.x86_64 (@anaconda-ScientificLinux-201202061444.x86_64)
libqpidcommon.so.5()(64bit)
Updated By: qpid-cpp-client-0.14-22.el6_3.x86_64 (sl-security)
Not found
Error: Package: matahari-network-0.4.4-11.el6.x86_64 (@anaconda-ScientificLinux-201202061444.x86_64)
Requires: libqpidclient.so.5()(64bit)
Removing: qpid-cpp-client-0.12-6.el6.x86_64 (@anaconda-ScientificLinux-201202061444.x86_64)
libqpidclient.so.5()(64bit)
Updated By: qpid-cpp-client-0.14-22.el6_3.x86_64 (sl-security)
Not found
Error: Package: matahari-sysconfig-0.4.4-11.el6.x86_64 (@anaconda-ScientificLinux-201202061444.x86_64)
Requires: libqpidcommon.so.5()(64bit)
Removing: qpid-cpp-client-0.12-6.el6.x86_64 (@anaconda-ScientificLinux-201202061444.x86_64)
libqpidcommon.so.5()(64bit)
Updated By: qpid-cpp-client-0.14-22.el6_3.x86_64 (sl-security)
Not found
Error: Package: matahari-host-0.4.4-11.el6.x86_64 (@anaconda-ScientificLinux-201202061444.x86_64)
Requires: libqpidcommon.so.5()(64bit)
Removing: qpid-cpp-client-0.12-6.el6.x86_64 (@anaconda-ScientificLinux-201202061444.x86_64)
libqpidcommon.so.5()(64bit)
Updated By: qpid-cpp-client-0.14-22.el6_3.x86_64 (sl-security)
Not found
Error: Package: libvirt-qmf-0.3.0-4.el6.x86_64 (@anaconda-ScientificLinux-201202061444.x86_64)
Requires: libqpidcommon.so.5()(64bit)
Removing: qpid-cpp-client-0.12-6.el6.x86_64 (@anaconda-ScientificLinux-201202061444.x86_64)
libqpidcommon.so.5()(64bit)
Updated By: qpid-cpp-client-0.14-22.el6_3.x86_64 (sl-security)
Not found
Error: Package: matahari-agent-lib-0.4.4-11.el6.x86_64 (@anaconda-ScientificLinux-201202061444.x86_64)
Requires: libqpidcommon.so.5()(64bit)
Removing: qpid-cpp-client-0.12-6.el6.x86_64 (@anaconda-ScientificLinux-201202061444.x86_64)
libqpidcommon.so.5()(64bit)
Updated By: qpid-cpp-client-0.14-22.el6_3.x86_64 (sl-security)
Not found
Error: Package: matahari-network-0.4.4-11.el6.x86_64 (@anaconda-ScientificLinux-201202061444.x86_64)
Requires: libqpidcommon.so.5()(64bit)
Removing: qpid-cpp-client-0.12-6.el6.x86_64 (@anaconda-ScientificLinux-201202061444.x86_64)
libqpidcommon.so.5()(64bit)
Updated By: qpid-cpp-client-0.14-22.el6_3.x86_64 (sl-security)
Not found
Error: Package: matahari-agent-lib-0.4.4-11.el6.x86_64 (@anaconda-ScientificLinux-201202061444.x86_64)
Requires: libqpidclient.so.5()(64bit)
Removing: qpid-cpp-client-0.12-6.el6.x86_64 (@anaconda-ScientificLinux-201202061444.x86_64)
libqpidclient.so.5()(64bit)
Updated By: qpid-cpp-client-0.14-22.el6_3.x86_64 (sl-security)
Not found
Error: Package: matahari-service-0.4.4-11.el6.x86_64 (@anaconda-ScientificLinux-201202061444.x86_64)
Requires: libqpidclient.so.5()(64bit)
Removing: qpid-cpp-client-0.12-6.el6.x86_64 (@anaconda-ScientificLinux-201202061444.x86_64)
libqpidclient.so.5()(64bit)
Updated By: qpid-cpp-client-0.14-22.el6_3.x86_64 (sl-security)
Not found
You could try using –skip-broken to work around the problem
** Found 1 pre-existing rpmdb problem(s), ‘yum check’ output follows:
libvpx-1.0.0-1.el6.x86_64 is a duplicate with libvpx-0.9.0-8.el6_0.x86_64

上述更新错误,解决方法:

yum remove matahari*

分类: Linux, 解决方案 标签: ,

安装CentOS 出现Disk sda contains BIOS RAID metadata解决方法

2015年1月14日 没有评论

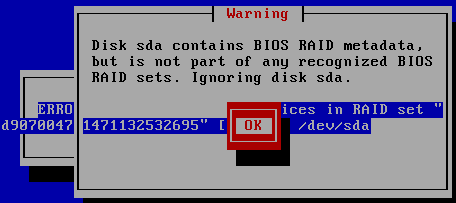
在安装CentOS 6系统的时候,当进到检测硬盘的时候,总是过不去,报错如下: Disk sda contains BIOS RAID metadata, but is not part of any recognized BIOS RAID sets. Ignoring disk sda 。

如下图显示:


解决办法1:
硬盘显示偶尔/dev/sda,偶尔/dev/sdb。。
从提示看貌似以前该硬盘做过RAID。。但问题是,这是个新的硬盘这样提示。该提示导致系统无法认到硬盘,没法继续安装系统。
后来经过一番Google,安装系统时,输入linux nodmraid就可以继续安装了。。
linux nodmraid命令的意思是关掉阵列。

进入安装选择菜单时

按TAB键,会进入到Linux的命令行模式,然后在启动命令行的后面添加nodmraid(注意前面先加个空格)并按ENTER。

接下进入安装的过程就会发现硬盘找到了。

>vmlinuz initrd=initrd.img nodmraid

要想在后续安装系统时不会出现以上提示,以下是彻底解决方法:
把硬盘放到另外一台机器上
# dmraid -rE /dev/sdb
no raid disks and with names: “/dev/sdb”
不行啊。网上搜索一下,有朋友给出一个更加简单的办法,用parted
网上搜索一下,有朋友给出一个更加简单的办法,用parted
# parted /dev/sdb –script mklabel gpt
# parted /dev/sdb –script — mkpart primary 0 -1
Warning: The resulting partition is not properly aligned for best performance.
# parted /dev/sdb –script print
Model: ATA TOSHIBA MK1002TS (scsi)
Disk /dev/sdb: 1000GB
Sector size (logical/physical): 512B/512B
Partition Table: gpt

Number Start  End  Size  File system Name  Flags
1  17.4kB 1000GB 1000GB        primary处理完,放回原来的机器,居然就没问题,顺利装完系统。
如果是这样,在急救模式下,运行parted,也是应该没问题。

如果还不行,最后一招就是DD
dd if=/dev/null of=/dev/sda bs=512 count=1
解决办法2(推荐):

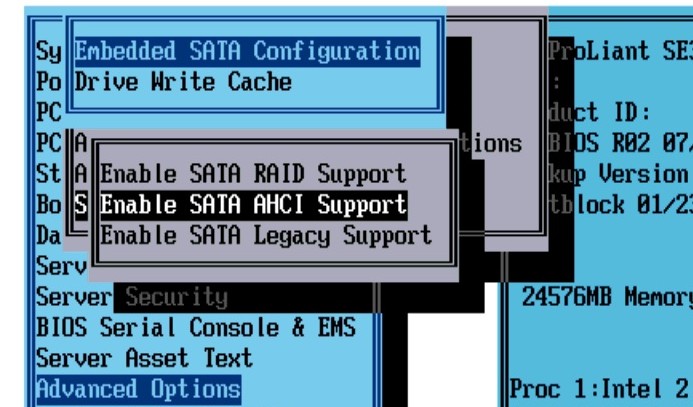
其实多数情况下这种提示我们进入bios下面的 Advanced Options 里按图片选择 这个AHCI 就可以了。


Linux 下用 smartd 监测硬盘状况

2015年1月14日 没有评论

和处理器、内存比较,硬盘是服务器上最慢的子系统、是最容易出现性能瓶颈的地方,也是最脆弱的部分。因为硬盘离处理器距离最远而且访问硬盘要涉及到一些机械操作,比如转轴、寻轨等,而机械是容易出故障的。作为 VPS 服务商和系统管理员来说,最害怕的就是硬盘出毛病,所以监测硬盘的健康状况、提前预警是件很重要的事情。我们 PC 服务器上差不多1.5年都会有硬盘坏掉,坏掉前一点征兆都没有,SUN 服务器上的情况要好得到,很多 SATA/SCSI 硬盘运行了5年都没问题,看样子品牌服务器还是贵得有理由的。VPSee 前段时间看过 Google 发表的一篇论文:Failure Trends in a Large Disk Drive Population 也证实了我们的经历,结论是所有坏掉的硬盘中只有60%可以被 S.M.A.R.T. 检测到,也就是说 S.M.A.R.T. 的测试结果只有60%是正确的,所以我们还不能完全依赖 S.M.A.R.T. 的监测结果。

目前市面上所有的硬盘都具有 S.M.A.R.T. (Self-Monitoring, Analysis and Reporting Technology) 特性,smartmontools 就是利用这一特性监测硬盘的软件包,包含 smartctl 和 smartd 两个程序,前者是前台命令行工具、后者是后台运行程序,smartmontools 不是 Linux 的专利,也支持 BSD, Solaris 等系统。

安装 smartmontools

在 CentOS 5.x 下安装:

# yum install kernel-utils
在 CentOS 6.x/Fedora 下安装:

# yum install smartmontools
在 Debian/Ubuntu 下安装:

# apt-get install smartmontools
使用 smartmontools

在使用 smartmontools 测试之前先检查一下硬盘是否具有 SMART 特性:

# smartctl -i /dev/sda

=== START OF INFORMATION SECTION ===
Device Model: SEAGATE ST32500NSSUN250G 0741B58YP8
Serial Number: 5QE58YP8
Firmware Version: 3.AZK
User Capacity: 250,056,000,000 bytes
Device is: Not in smartctl database [for details use: -P showall]
ATA Version is: 7
ATA Standard is: Exact ATA specification draft version not indicated
Local Time is: Thu Jul 22 22:39:07 2010 SAST
SMART support is: Available – device has SMART capability.
SMART support is: Enabled
如果上面 SMART support 是 Disabled 状态的话,需要开启 SMART 的支持:

# smartctl -s on /dev/sda

=== START OF ENABLE/DISABLE COMMANDS SECTION ===
SMART Enabled.
检查硬盘状况,如果下面的结果不是 PASSED 的话你需要立刻警觉起来,马上备份所有数据,硬盘随时都可能出问题(不过值得注意的是就算结果是 PASSED 并不意味着硬盘100%就安全,PASS 不能代表没问题,没 PASS 代表一定有问题):

# smartctl -H /dev/sda

=== START OF READ SMART DATA SECTION ===
SMART overall-health self-assessment test result: PASSED
做个快速自检:

# smartctl -t short /dev/sda

=== START OF OFFLINE IMMEDIATE AND SELF-TEST SECTION ===
Sending command: “Execute SMART Short self-test routine immediately in off-line mode”.
Drive command “Execute SMART Short self-test routine immediately in off-line mode” successful.
Testing has begun.
Please wait 1 minutes for test to complete.
Test will complete after Thu Jul 22 22:51:00 2010

Use smartctl -X to abort test.
执行上面的自检命令后等待一段时间,可以通过下面命令来看进度和结果:

# smartctl -l selftest /dev/sda

=== START OF READ SMART DATA SECTION ===
SMART Self-test log structure revision number 1
Num Test_Description Status Remaining LifeTime(hours) LBA_of_first_error
# 1 Short offline Completed without error 00% 20949 -
# 2 Short offline Completed without error 00% 20947 -

要做长时间自检的话(很耗时,建议放在凌晨时间段做):

# smartctl -t long /dev/sda
查看出错日志:

# smartctl -l error /dev/sda

=== START OF READ SMART DATA SECTION ===
SMART Error Log Version: 1
No Errors Logged
配置 smartmontools

在 CentOS/Fedora 下:

# vi /etc/smartd.conf
# /etc/init.d/smartd restart
在 Debian/Ubuntu 下:

# vi /etc/default/smartmontools
# vi /etc/smartd.conf
# /etc/init.d/smartmontools restart
可以通过修改以上的 smartmontools 的配置文件来定期对硬盘做健康检查,就像给人定期体检一样,体检过了并不代表就没病(很多疾病用体检的设备都查不到),所以这也符合 Google 的硬盘报告所说的情况,所有坏掉的硬盘中只有60%可以被 S.M.A.R.T. 检测到(所有生病的人中只有60%能在体检的时候发现)。


Linux系统中的load average

2015年1月1日 没有评论

一、什么是load average?
linux系统中的Load对当前CPU工作量的度量 (WikiPedia: the system load is a measure of the amount of work that a computer system is doing)。也有简单的说是进程队列的长度。
Load Average 就是一段时间 (1 分钟、5分钟、15分钟) 内平均 Load 。

我们可以通过系统命令”w”查看当前load average情况

[root@CNC-BJ-5-3N1 ~]# w
20:01:55 up 76 days, 8:20, 6 users, load average: 1.30, 1.48, 1.69

上面内容显示系统负载为“1.30, 1.48, 1.69”,这3个值是什么意思呢?
第一位1.30:表示最近1分钟平均负载
第二位1.48:表示最近5分钟平均负载
第三位1.69:表示最近15分钟平均负载

PS. linux系统是5秒钟进行一次Load采样
二、load average值的含义
2.1 单核处理器
假设我们的系统是单CPU单内核的,把它比喻成是一条单向马路,把CPU任务比作汽车。当车不多的时候,load <1;当车占满整个马路的时候 load=1;当马路都站满了,而且马路外还堆满了汽车的时候,load>1

Load < 1
Load = 1
Load >1

2.2 多核处理器
我们经常会发现服务器Load > 1但是运行仍然不错,那是因为服务器是多核处理器(Multi-core)。
假设我们服务器CPU是2核,那么将意味我们拥有2条马路,我们的Load = 2时,所有马路都跑满车辆。

Load = 2时马路都跑满了

#查看CPU core
grep ‘model name’ /proc/cpuinfo | wc -l

3. 什么样的Load average值要提高警惕
0.7 < load < 1: 此时是不错的状态,如果进来更多的汽车,你的马路仍然可以应付。
load = 1: 你的马路即将拥堵,而且没有更多的资源额外的任务,赶紧看看发生了什么吧。
load > 5: 非常严重拥堵,我们的马路非常繁忙,每辆车都无法很快的运行
4. 三种Load值,应该看哪个?
通常我们先看15分钟load,如果load很高,再看1分钟和5分钟负载,查看是否有下降趋势。
1分钟负载值 > 1,那么我们不用担心,但是如果15分钟负载都超过1,我们要赶紧看看发生了什么事情。所以我们要根据实际情况查看这三个值。

分类: Linux 标签: ,