存档

‘解决方案’ 分类的存档

清理 Docker 日志

2022年12月3日 没有评论

一、概述
Docker 在不重建容器的情况下,日志文件默认会一直追加,时间一长会逐渐占满服务器的硬盘的空间,内存消耗也会一直增加。

Docker 的日志文件存在 /var/lib/docker/containers 目录中

二、处理方案
2.1 使用脚本清理日志(治标)
clean_docker_logs.sh

1
2
3
4
5
6
7
8
9
10
11
12
#!/bin/bash
echo "==================== start clean docker containers logs =========================="
 
logs=$(find /var/lib/docker/containers/ -name *-json.log)
 
for log in $logs
  do
    echo "clean logs : $log"
    cat /dev/null > $log
  done
 
echo "==================== end clean docker containers logs   =========================="

2.2 设置Docker容器日志大小(治本)
修改docker-compose.yml

示例:

1
2
3
4
5
6
7
8
  gateway-services:
    container_name: gateway-services
    image: adoptopenjdk/openjdk8
    restart: always
    logging:
      driver: "json-file"
      options:
        max-size: "50m"

max-size=50m,意味着一个容器日志大小上限是50M

重启docker

docker-compose –compatibility up -d

分类: Linux, 解决方案 标签: ,

CACTI监控只能查看一天数据,不能显示其他时间解决方法

2022年11月23日 没有评论

引起这个原因是因为在网站存放位置的:
graph_image.php
graph_json.php
graph_view.php
graph_xport.php
因为限制了时间戳的最大时间是1600000000,此时间为2020-09-13 20:26:40
改为2600000000或者更大

存在BUG的版本:

=0.8.7<1.2.10
0.8.7至1.2.10所有版本,均会出现此故障
不受影响的版本:
=1.2.10后所有版本,<0.8.7前所有版本

问题分析
Cacti从0.8.7版本开始,也就是说在2007年(13年前)设置了时间戳的值为1600000000,转换成时间为2020-09-13 20:26:40,表示在2020年9月13日20点26分40秒后,选择过滤图形时间会导致失效,图形过滤器出现BUG。
3.修复方法

0.8.7版本至1.0.0版本修复方法如下:

修改当前web根目录下的graph_xport.php和graph_image.php两个文件,查找1600000000,每个文件中会有两个这个值,将其全部改成2088385563,修改后无需重启任何服务,直接刷新当前浏览器即可!
if (!empty(_GET["graph_start"]) &&_GET["graph_start"] < 1600000000) {
graphdataarray["graphstart"]=_GET["graph_start"];
}

if (!empty(_GET["graph_end"]) &&_GET["graph_end"] < 1600000000) {
graphdataarray["graphend"]=_GET["graph_end"];
}

1.0.0版本至1.2.10版本修复方法如下:

修改当前web根目录下的graph_image.php、graph_json.php、graph_xport.php、remote_agent.php这四个文件,查找1600000000,将其全部改成2088385563,修改后无需重启任何服务,直接刷新当前浏览器即可!

if (!isempty_request_var(‘graph_start’) && get_request_var(‘graph_start’) < 1600000000) {
$graph_data_array['graph_start'] = get_request_var(‘graph_start’);
}

if (!isempty_request_var(‘graph_end’) && get_request_var(‘graph_end’) < 1600000000) {
$graph_data_array['graph_end'] = get_request_var(‘graph_end’);
}

分类: 解决方案 标签: ,

-bash: warning: setlocale: LC_CTYPE: cannot change locale (UTF-8): No such file or directory

2022年10月13日 没有评论

ssh 连接 centos 服务器时报警告:

-bash: warning: setlocale: LC_CTYPE: cannot change locale (UTF-8): No such file or directory

原因是 ssh连接的时候会传递环境变量,这个变量如在服务器没有的环境,就会报这个错误,是LC_CTYPE这个环境变量导致的提示。

对于LC_CTYPE的参数,我们一般建议设置成UTF-8,服务器上配置文件缺少相应配置参数。所以就报错了。

解决办法:
在centos上运行

vi /etc/locale.conf

内容改为:

LANG=en_US.utf8
LC_ALL=en_US.utf8
LC_CTYPE=en_US.utf8

重新连接ssh,就可以解决错误提示。

分类: Linux, 解决方案 标签: , ,

proxmox 7 :WARN: old systemd (< v232) detected, container won't run in a pure cgroupv2 environment! Please see documentation -> container -> cgroup version.

2022年10月13日 没有评论

proxmox 升到7,或是安装7后的版本在使用旧的pct模版LXC的 Centos 7 无法开机,出现以下错误提示:

WARN: old systemd (< v232) detected, container won't run in a pure cgroupv2 environment! Please see documentation -> container -> cgroup version.

TASK WARNINGS: 1

解決方法如下

vim /etc/default/grub

找到以下
GRUB_CMDLINE_LINUX_DEFAULT=”quiet”

改成以下

GRUB_CMDLINE_LINUX_DEFAULT=”systemd.unified_cgroup_hierarchy=0 quiet”

运行更新grub

update-grub

重启服务器
reboot

centos6 yum源不能使用解决办法

2022年10月2日 没有评论

2020年11月30日 centos6各大开源镜像站已经停止维护了!但是阿里源还是可以用的通道,因为他的centos-vault仓库里放了之前版本的centos的包。

只需要在centos命令行界面下执行一下几条命令即可解决问题。命令如下:

1
2
3
4
5
sed -i "s|enabled=1|enabled=0|g" /etc/yum/pluginconf.d/fastestmirror.conf
mv /etc/yum.repos.d/CentOS-Base.repo /etc/yum.repos.d/CentOS-Base.repo.backup
curl -o /etc/yum.repos.d/CentOS-Base.repo https://www.xmpan.com/Centos-6-Vault-Aliyun.repo 
yum clean all
yum makecache

如无法下载Centos-6-Vault-Aliyun.repo文件,可以将以下内容复制存为文件使用即可。

1
2
3
4
5
6
7
8
9
10
11
12
13
14
15
16
17
18
19
20
21
22
23
24
25
26
27
28
29
30
31
32
33
34
35
36
37
38
39
40
41
42
43
44
45
46
47
48
49
50
51
52
# CentOS-Base.repo
#
# The mirror system uses the connecting IP address of the client and the
# update status of each mirror to pick mirrors that are updated to and
# geographically close to the client.  You should use this for CentOS updates
# unless you are manually picking other mirrors.
#
# If the mirrorlist= does not work for you, as a fall back you can try the 
# remarked out baseurl= line instead.
#
#
 
[base]
name=CentOS-6.10 - Base - mirrors.aliyun.com
failovermethod=priority
baseurl=http://mirrors.aliyun.com/centos-vault/6.10/os/$basearch/
gpgcheck=1
gpgkey=http://mirrors.aliyun.com/centos-vault/RPM-GPG-KEY-CentOS-6
 
#released updates 
[updates]
name=CentOS-6.10 - Updates - mirrors.aliyun.com
failovermethod=priority
baseurl=http://mirrors.aliyun.com/centos-vault/6.10/updates/$basearch/
gpgcheck=1
gpgkey=http://mirrors.aliyun.com/centos-vault/RPM-GPG-KEY-CentOS-6
 
#additional packages that may be useful
[extras]
name=CentOS-6.10 - Extras - mirrors.aliyun.com
failovermethod=priority
baseurl=http://mirrors.aliyun.com/centos-vault/6.10/extras/$basearch/
gpgcheck=1
gpgkey=http://mirrors.aliyun.com/centos-vault/RPM-GPG-KEY-CentOS-6
 
#additional packages that extend functionality of existing packages
[centosplus]
name=CentOS-6.10 - Plus - mirrors.aliyun.com
failovermethod=priority
baseurl=http://mirrors.aliyun.com/centos-vault/6.10/centosplus/$basearch/
gpgcheck=1
enabled=0
gpgkey=http://mirrors.aliyun.com/centos-vault/RPM-GPG-KEY-CentOS-6
 
#contrib - packages by Centos Users
[contrib]
name=CentOS-6.10 - Contrib - mirrors.aliyun.com
failovermethod=priority
baseurl=http://mirrors.aliyun.com/centos-vault/6.10/contrib/$basearch/
gpgcheck=1
enabled=0
gpgkey=http://mirrors.aliyun.com/centos-vault/RPM-GPG-KEY-CentOS-6
分类: Linux, 解决方案 标签: ,

The PERC1 battery is low.DELL R620服务器idrac显示电源错误修复办法。

2022年8月3日 没有评论

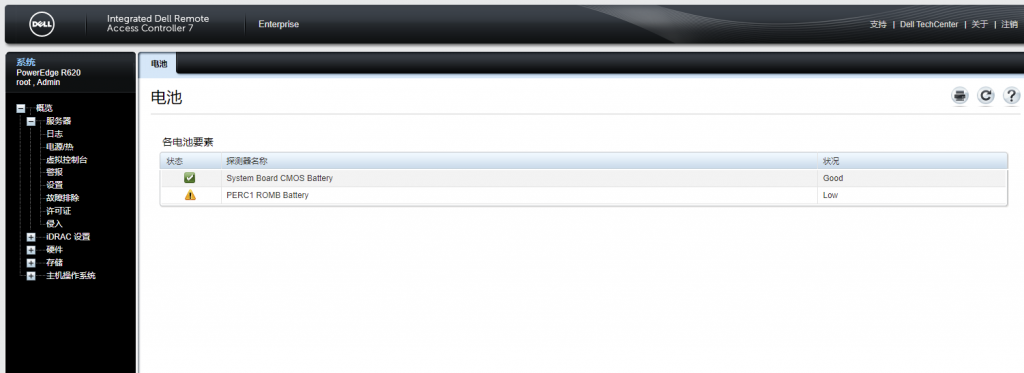
DELL R620的机器有好几年了。bios电池也快没电了。idrac老显示黄标。于是更换了个新的电池。以为搞定了。不想还是反复提示:
系统事件日志报:The PERC1 battery is low.
电池 显示黄标

上网查了一下,dell还是有提供解决办法的。具体办法需要下载效验工具文件。不过这个工具好像是对硬盘阵列用的。也不知道为什么能也用于校对电池。
我下的是LINUX下的。

1
2
3
4
5
6
7
8
9
10
11
12
13
14
15
16
17
18
19
20
21
22
23
24
25
26
27
28
29
30
31
32
33
34
35
36
37
38
39
40
41
42
43
44
45
46
47
48
49
50
51
52
53
54
55
56
57
58
59
60
61
62
63
wget https://downloads.dell.com/FOLDER03559396M/1/perccli-1.17.10-1.noarch.rpm
rpm -ivh perccli-1.17.10-1.noarch.rpm
 
[root@localhost perccli]# cd /opt/MegaRAID/perccli //进入程序目录。默认perccli64是不能运行的。不是内部命令。
 
[root@localhost perccli]# ./perccli64 /c0/bbu show all >/root/a.txt //转存一下信息很长。
 
//我选发一部分发出来比较重要的提示信息给大家标出来。
 
BBU_Capacity_Info :
=================
 
------------------------------------------------------
Property Value
------------------------------------------------------
Relative State of Charge 0%
Absolute State of charge 0%
Remaining Capacity 0 mAh            //主要看这里这是显示0其实不对。新电池应该是满的 
Full Charge Capacity 396 mAh         //电池主容量以下运行校对命令后再运行show all后这两个地方应该会显示一致。
Run time to empty Battery is not being charged
Average time to empty 0 min
Average Time to full Battery is not being charged
Cycle Count 15
Max Error 0%
Remaining Capacity Alarm 0 mAh
Remining Time Alarm 0 minutes(s)
------------------------------------------------------
//运行以下校对命令校对电池容量。
[root@localhost perccli]# ./perccli64 /c0/bbu start learn
Controller = 0
Status = Success
Description = None
 
BBU_Set_Prop :
============
 
------------------------
BBU-Prop Description
------------------------
Start Learn Success
------------------------
//这样就完成了校对工作。
 
[root@localhost perccli]# ./perccli64 /c0/bbu show all >/root/b.txt //转存一下新的信息。可以看到如下比较重要的
 
BBU_Capacity_Info :
=================
 
------------------------------------------------------
Property Value
------------------------------------------------------
Relative State of Charge 100%
Absolute State of charge 0%
Remaining Capacity 396 mAh                    //这里正确的应该有显示不是0了。 
Full Charge Capacity 396 mAh
Run time to empty Battery is not being charged
Average time to empty 32 min
Average Time to full Battery is not being charged
Cycle Count 15
Max Error 0%
Remaining Capacity Alarm 0 mAh
Remining Time Alarm 0 minutes(s)
------------------------------------------------------

关机。拔掉所有的电源。然后过15分钟接上开机。然后再进idrac看一下电池显示。应该全绿标了。

分类: 解决方案 标签: ,

火狐浏览器报错 建立安全连接失败 连接到idrac6时发生错误。您正试图导入一个与已存在证书相同颁发者和序列号但却不相同的证书。错误代码SEC_ERROR_REU

2022年7月4日 没有评论

火狐浏览器报错 建立安全连接失败 连接到idrac6时发生错误。您正试图导入一个与已存在证书相同颁发者和序列号但却不相同的证书。错误代码SEC_ERROR_REU

类似以上的这种错误提示。网上找了一通代码错误的处理办法没用。没解决问题。还以为是idrac挂了。后面终于找到网上有人给出的方法。很有效果:

方法一、鼠标放在浏览器最上方边框处点击右键,选择菜单栏,选择帮助>故障排除信息。打开应用程序概要>配置文件夹。
方法二、地址框运行about:support 然后同上选择帮助>故障排除信息。打开应用程序概要>配置文件夹。

一般在这类目录下:C:\Users\Administrator\AppData\Roaming\Mozilla\Firefox\Profiles\***.default-release-*

删除cert9.db文件就可以了。(先关掉火狐浏览器再删除)

分类: 解决方案 标签: ,

宝塔面板iis申请免费证书运行时错误_错误信息:The ACME server was probably unable to reach

2022年6月5日 没有评论

最近在使用宝塔自带的Let’s Encrypt的IIS所在windows环境上安装配置免费SSL证书时,出现ssl申请失败的提示。前期怎么设置文件访问下载之类的后辍也不行。后面查了一下原因是可以按以下步骤解决。希望对大家有用。

原因是Let’s Encrypt会首先尝试对IIS站点进行有效性验证。

其基本过程为:

1) 接收用户输入的主机名,如www.test.com
2) 接收用户输入的站点根目录的全路径,如c:\wwwroot
3) 尝试在站点根目录下创建.well-known目录并在该目录生成一个文件,文件内容为一串随机字符串,Let’s Encrypt官网会尝试访问此随机字符串。如果访问成功,则站点验证成功。

由于当IIS的MIME类型未对该随机文件设定处理程序时,会出现如下的错误:

The ACME server was probably unable to reach http://www.test.com/.well-known/acme-challenge/xxx(随机字符串)

这个是因为IIS未指定对没有后缀名的文件进行何种处理,所以直接访问此随机文件,会提示错误。
打开IIS的详细错误报告后,根据不同错误提示,可以有以下不同的解决方法

一、错误1:

HTTP 错误 404.17 – Not Found

请求的内容似乎是脚本,因而将无法由静态文件处理程序来处理。

解决方法:

1) 打开IIS管理器,选择Web服务器。
2) 选择右侧 处理程序映射
3) 点击右上角菜单 查看经过排序的列表
4) 列表最下方有个StaticFile的处理程序,将其移动到3个ExtensionlessUrlHandler的上方。

5) 重启IIS服务。

二、错误2:

HTTP 错误 404.3 – Not Found

由于扩展配置问题而无法提供您请求的页面。如果该页面是脚本,请添加处理程序。如果应下载文件,请添加 MIME 映射。

解决方法:

1) 打开IIS管理器,选择Web服务器。
2) 选择右侧 MIME类型
3) 新增MIME类型,扩展名:*, 类型:application/octet-stream。
4) 重启IIS服务。

若以上方法都无法解决问题,则可以尝试恢复处理程序映射:

1) 打开IIS管理器,选择Web服务器。
2) 选择右侧 处理程序映射
3) 点击 恢复为父项
4) 重启IIS服务。

以上是解决的具体办法,亲测有效。

ubuntu 17 更换apt源

2022年5月20日 没有评论

有一些生产环境的服务器上的ubuntu 17 18系统很久没搞了。升级的源都太旧了。网上找了几个源,测试了一下更新。希望能对大家有帮助。

1
sudo vim /etc/apt/sources.list

清空,更换成以下内容。然后保存退出。

1
2
3
4
5
6
7
8
9
10
11
12
13
14
15
16
17
18
19
20
21
deb-src http://archive.ubuntu.com/ubuntu artful main restricted #Added by software-properties
deb http://mirrors.aliyun.com/ubuntu/ artful main restricted
deb-src http://mirrors.aliyun.com/ubuntu/ artful main restricted multiverse universe #Added by software-properties
deb http://mirrors.aliyun.com/ubuntu/ artful-updates main restricted
deb-src http://mirrors.aliyun.com/ubuntu/ artful-updates main restricted multiverse universe #Added by software-properties
deb http://mirrors.aliyun.com/ubuntu/ artful universe
deb http://mirrors.aliyun.com/ubuntu/ artful-updates universe
deb http://mirrors.aliyun.com/ubuntu/ artful multiverse
deb http://mirrors.aliyun.com/ubuntu/ artful-updates multiverse
deb http://mirrors.aliyun.com/ubuntu/ artful-backports main restricted universe multiverse
deb-src http://mirrors.aliyun.com/ubuntu/ artful-backports main restricted universe multiverse #Added by software-properties
deb http://archive.canonical.com/ubuntu artful partner
deb-src http://archive.canonical.com/ubuntu artful partner
deb http://mirrors.aliyun.com/ubuntu/ artful-security main restricted
deb-src http://mirrors.aliyun.com/ubuntu/ artful-security main restricted multiverse universe #Added by software-properties
deb http://mirrors.aliyun.com/ubuntu/ artful-security universe
deb http://mirrors.aliyun.com/ubuntu/ artful-security multiverse
deb http://mirrors.aliyun.com/ubuntu bionic main multiverse restricted universe
deb http://mirrors.aliyun.com/ubuntu bionic-updates main multiverse restricted universe
deb http://mirrors.aliyun.com/ubuntu bionic-security main multiverse restricted universe
deb http://mirrors.aliyun.com/ubuntu bionic-proposed main multiverse restricted universe

#将 /var/cache/apt/archives/ 的 所有 deb 删掉

1
sudo apt-get clean

#更新列表

1
2
sudo apt-get update -y
sudo apt-get upgrade -y

如果出现新完了之后,还出现了appstreamcli: error while loading shared libraries: libxapian.so.22: cannot open shared object file: No such file or directory
这之类的问题,按以下一般能解决。
解决方法:

1
2
3
4
5
apt --fix-broken install
apt-get install build-essential
apt-get install zlib1g-dev libc6-dev libc-dev libmysqlclient-dev
dpkg -l | grep libc6
apt-get install  libc6=2.19-0ubuntu6.9
分类: Linux, 解决方案 标签: , ,

记录在CentOS查看CPU使用率的脚本工具( htop命令安装和使用)

2022年5月2日 没有评论

我们在常规的运维服务器的时候使用最多的就是查看服务器的CPU使用率,其中我们常用的可能是TOP命令。这里老左在学习一个有网友可能也有常用的比较专业的Htop命令。这里老左在当前的CENTOS系统中进行测试看看。

1、htop软件工具安装

一般么我们的CENTOS服务器系统中是没有安装部署htop的,我们需要先安装一下。直接yum应该不行,我们直接自己安装。

yum -y install ncurses-devel wget
wget http://hisham.hm/htop/releases/2.0.2/htop-2.0.2.tar.gz
tar xvfvz htop-2.0.2.tar.gz
cd htop-2.0.2
./configure –disable-unicode && make && make install

2、如何使用

htop

这里我们可以详细的看到CPU对于文件和目录的使用数据情况。

第一区域:CPU、内存、Swap的使用情况;

第二区域:任务、线程、平均负载及系统运行时间的信息。平均负载部分提供了三个数字,这仅仅表示的是过去的5分钟、10分钟和15分钟系统的平均负载而已,在单核的系统中平均负载为1表示的是百分之百的 CPU 利用率。最后,运行时间 (uptime)标示的数字是从系统启动起到当前的运行总时间。

第三区域:当前系统中的所有进程。各列说明:

PID:进程标志号,是非零正整数
USER:进程所有者的用户名
PR:进程的优先级别
NI:进程的优先级别数值
VIRT:进程占用的虚拟内存值
RES:进程占用的物理内存值
SHR:进程使用的共享内存值
S:进程的状态,其中S表示休眠,R表示正在运行,Z表示僵死状态,N表示该进程优先值是负数
%CPU:该进程占用的CPU使用率
%MEM:该进程占用的物理内存和总内存的百分比
TIME+:该进程启动后占用的总的CPU时间
COMMAND:进程启动的启动命令名称

第四区域:当前界面中F1-F10功能键中定义的快捷功能。即底部菜单栏。

分类: Linux, 解决方案 标签: ,