存档

‘Linux’ 分类的存档

Centos7 firewalld·动态防火墙使用方法示例

2020年1月9日 没有评论

# systemctl start firewalld # 启动,
# systemctl enable firewalld # 开机启动
# systemctl stop firewalld # 关闭
# systemctl disable firewalld # 取消开机启动
具体的规则管理,可以使用firewall-cmd ,具体的使用方法可以
$ firewall-cmd –help

–zone=NAME # 指定 zone
–permanent # 永久修改,–reload 后生效
–timeout=seconds # 持续效果,到期后自动移除,用于调试,不能与 –permanent 同时使用
1. 查看规则

查看运行状态
$ firewall-cmd –state
查看已被激活的 Zone 信息
$ firewall-cmd –get-active-zones
public
interfaces: eth0 eth1
查看指定接口的 Zone 信息
$ firewall-cmd –get-zone-of-interface=eth0
public
查看指定级别的接口
$ firewall-cmd –zone=public –list-interfaces
eth0
查看指定级别的所有信息,譬如 public

$ firewall-cmd –zone=public –list-all
public (default, active)
interfaces: eth0
sources:
services: dhcpv6-client http ssh
ports:
masquerade: no
forward-ports:
icmp-blocks:
rich rules:

查看所有级别被允许的信息
$ firewall-cmd –get-service
查看重启后所有 Zones 级别中被允许的服务,即永久放行的服务
$ firewall-cmd –get-service –permanent
2. 管理规则

# firewall-cmd –panic-on # 丢弃
# firewall-cmd –panic-off # 取消丢弃
# firewall-cmd –query-panic # 查看丢弃状态
# firewall-cmd –reload # 更新规则,不重启服务
# firewall-cmd –complete-reload # 更新规则,重启服务
添加某接口至某信任等级,譬如添加 eth0 至 public,永久修改
# firewall-cmd –zone=public –add-interface=eth0 –permanent

设置 public 为默认的信任级别
# firewall-cmd –set-default-zone=public
a. 管理端口

列出 dmz 级别的被允许的进入端口
# firewall-cmd –zone=dmz –list-ports

允许 tcp 端口 8080 至 dmz 级别
# firewall-cmd –zone=dmz –add-port=8080/tcp

允许某范围的 udp 端口至 public 级别,并永久生效
# firewall-cmd –zone=public –add-port=5060-5059/udp –permanent

b. 网卡接口

列出 public zone 所有网卡
# firewall-cmd –zone=public –list-interfaces

将 eth0 添加至 public zone,永久
# firewall-cmd –zone=public –permanent –add-interface=eth0

eth0 存在与 public zone,将该网卡添加至 work zone,并将之从 public zone 中删除
# firewall-cmd –zone=work –permanent –change-interface=eth0

删除 public zone 中的 eth0,永久
# firewall-cmd –zone=public –permanent –remove-interface=eth0

c. 管理服务

添加 smtp 服务至 work zone
# firewall-cmd –zone=work –add-service=smtp

移除 work zone 中的 smtp 服务
# firewall-cmd –zone=work –remove-service=smtp

d. 配置 external zone 中的 ip 地址伪装

查看
# firewall-cmd –zone=external –query-masquerade

打开伪装
# firewall-cmd –zone=external –add-masquerade

关闭伪装
# firewall-cmd –zone=external –remove-masquerade

e. 配置 public zone 的端口转发

要打开端口转发,则需要先
# firewall-cmd –zone=public –add-masquerade

然后转发 tcp 22 端口至 3753
# firewall-cmd –zone=public –add-forward-port=port=22:proto=tcp:toport=3753

转发 22 端口数据至另一个 ip 的相同端口上
# firewall-cmd –zone=public –add-forward-port=port=22:proto=tcp:toaddr=192.168.1.100

转发 22 端口数据至另一 ip 的 2055 端口上
# firewall-cmd –zone=public –add-forward-port=port=22:proto=tcp:toport=2055:toaddr=192.168.1.100

f. 配置 public zone 的 icmp

查看所有支持的 icmp 类型
# firewall-cmd –get-icmptypes
destination-unreachable echo-reply echo-request parameter-problem redirect router-advertisement router-solicitation source-quench time-exceeded

列出
# firewall-cmd –zone=public –list-icmp-blocks

添加 echo-request 屏蔽
# firewall-cmd –zone=public –add-icmp-block=echo-request [--timeout=seconds]

移除 echo-reply 屏蔽
# firewall-cmd –zone=public –remove-icmp-block=echo-reply

g. IP 封禁

# firewall-cmd –permanent –add-rich-rule=”rule family=’ipv4′ source address=’222.222.222.222′ reject”

分类: Linux 标签: ,

rm删除文件恢复

2019年12月3日 没有评论

误删除linux系统文件了?不用急,本文将给你一个恢复linux文件的方法,让你轻松应对运维中的各种风险问题。方法总比问题多~
说在前面的话
针对日常维护操作,难免会出现文件误删除的操作。大家熟知linux文件系统不同win有回收站,删除后的文件可以到垃圾箱寻回,要知道linux文件修复比较费劲,网络上面的文档也是五花八门。所以本次研究一种比较靠谱的文件和目录恢复方法,也给维护人员留一条后路。
分析对比debugfs. testdisk 6.14. extundelete,对比各自官网介绍和操作说明本次决定研究extundelete对文件和目录的恢复操作。
extundelete下载官网地址:https://pkgs.org/download/extundelete

Linux下文件误删除,使用extundelete恢复测试过程
1. 给虚拟主机添加一块磁盘,磁盘为/dev/sdb,如下:

2. 格式化磁盘,并进行挂载
3. # mkfs.ext4 /dev/sdb
4. # mkdir /usr/local/dbdata/
# mount /dev/sdb /usr/local/dbdata/

5. 测试误操作删除以下文件
6. /usr/local/dbdata/gperftools-2.4.tar.gz #文件
7.
/usr/local/dbdata/pcre-8.32 #目录
执行误操作:
# rm -rf /usr/local/dbdata/gperftools-2.4.tar.gz /usr/local/dbdata/pcre-8.32
8. 将误操作所在分区进行只读保护
如果确定文件被误删,在没有备份的情况下请马上对分区实施写入保护(预防新的写入覆盖误删的块数据,因此权限给只读):
# mount -o remount,ro /dev/sdb
# mount -o remount,ro /usr/local/dbdata/
9. 数据恢复工具安装
工具安装部署
官方网站是http://extundelete.sourceforge.net/ ,其目前的稳定版本是extundelete-0.2.4.
工具下载
# wget https://nchc.dl.sourceforge.net/project/extundelete/extundelete/0.2.4/extundelete-0.2.4.tar.bz2
解压安装
依赖包
# yum -y install gcc-c++ e2fsprogs.x86_64 e2fsprogs-devel.x86_64
# tar -jxvf extundelete-0.2.4.tar.bz2
# cd extundelete-0.2.4
# ./configure
# make && make install
验证安装结果
# extundelete -v
10. 文件恢复过程
恢复指定文件:
原理:从根节点(inode=2)开始找到被删除文件的i节点,然后recover i节点。
以下是模拟删除gperftools-2.4.tar.gz(文件)和pcre-8.32 (目录)
先检测被删除的文件有哪些:
# extundelete /dev/sdb –inode 2

从圈出来的可以看到,有以下两个
gperftools-2.4.tar.gz 15 Deleted

pcre-8.32 655361 Deleted
注意:恢复过程不要在误删分区进行,谨防inode. block块相互覆盖
先恢复文件(可根据文件名进行恢复):
# extundelete /dev/sdb –restore-file gperftools-2.4.tar.gz

恢复目录(根据目录名恢复):
# extundelete /dev/sdb –restore-directory pcre-8.32

最后会在当前目录下看到一个名为RECOVERED_FILES的目录,在目录里就可以看到被误删除的文件以及目录:
说在后面的话

根据上面操作证明extundelete 工具可以实现对误删数据的恢复,而且操作简单。
总结:
1. 使用rm一定要谨慎
2. 磁盘按照功能进行分区是必要的
3. 最少掌握一种数据恢复方式

centos 下查看本机公网IP

2019年11月6日 没有评论

centos 下查看本机公网IP

1
curl ifconfig.me
分类: Linux, 解决方案 标签: ,

Centos7系统安装配置GitLab服务器

2019年9月3日 没有评论

1、首先

sudo yum update
更新当前库

2、执行以下命令

sudo yum install curl policycoreutils openssh-server openssh-clients -y
sudo systemctl enable sshd
sudo systemctl start sshd
sudo yum install postfix
sudo systemctl enable postfix
sudo systemctl start postfix
sudo firewall-cmd –permanent –add-service=http
sudo systemctl reload firewalld
其中 sudo yum install postfix 可能会报错,部分环境可能已经配置好此步,报错直接跳过。

3、添加gitlb官方地址至源文件

curl -sS https://packages.gitlab.com/install/repositories/gitlab/gitlab-ce/script.rpm.sh | sudo bash
提示如下:

The repository is setup! You can now install packages.
即可以开始安装

执行安装:

sudo yum install gitlab-ce -y
提示如下:

Installed:
gitlab-ce.x86_64 0:9.4.2-ce.0.el7

Complete!
即安装成功

4、执行配置脚本

sudo gitlab-ctl reconfigure
此步骤大概会执行3分钟左右,结果大概如下:

unning handlers:
Running handlers complete
Chef Client finished, 362/517 resources updated in 03 minutes 40 seconds
gitlab Reconfigured!
即可通过访问服务器地址访问,并进行初始化配置(默认为80端口,配置文件为:/etc/gitlab/gitlab.rb)

分类: Linux, 网络产品 标签: ,

Centos同步网络时间方法(tcp和udp方式)

2019年8月7日 没有评论

ntpdate只能用udp协议来同步时间,rdate支持用tcp协议或udp协议同步时间。

使用ntpdate更新时间

yum -y install ntpdate

/usr/sbin/ntpdate ntp1.aliyun.com

使用rdate更新时间

yum -y install rdate

查看时间rdate time-b.nist.gov

TCP方式更新(对时)服务器时间:rdate -s time-b.nist.gov或rdate -s time.nist.gov

UDP方式更新(对时)服务器时间:rdate -u time-b.nist.gov或rdate -u time.nist.gov

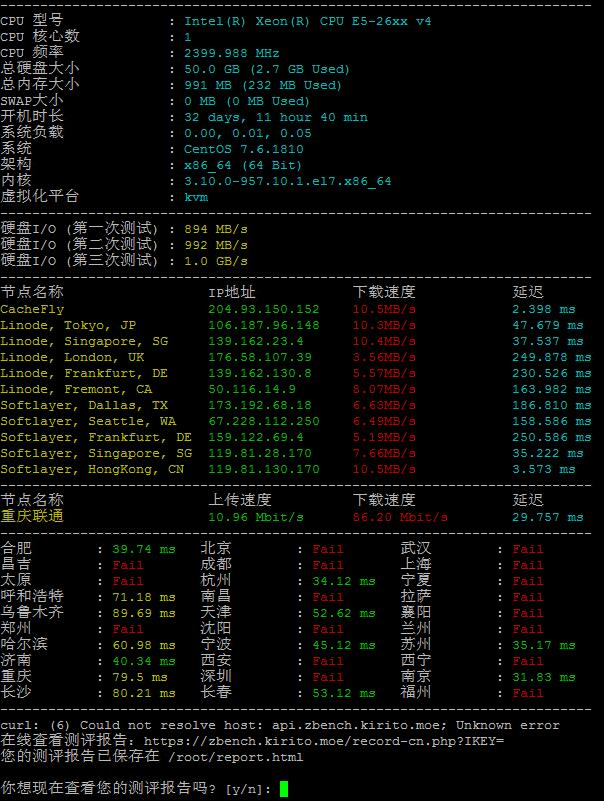
VPS性能一键测试脚本

2019年6月10日 没有评论

服务器性能测试

命令如下:
中文版:

1
wget -N --no-check-certificate https://raw.githubusercontent.com/FunctionClub/ZBench/master/ZBench-CN.sh && bash ZBench-CN.sh

英文版:

1
wget -N --no-check-certificate https://raw.githubusercontent.com/FunctionClub/ZBench/master/ZBench.sh && bash ZBench.sh

效果如下图所示:


分类: Linux 标签: ,

docker的简单状态监控

2019年6月8日 没有评论
1
2
3
4
5
6
7
8
9
10
11
12
13
14
 
docker stats
 
//可以使用占位符,显示想要看的信息:
 
docker stats --format "table {{.Container}}\t{{.CPUPerc}}\t{{.MemUsage}}\t{{.NetIO}}\t{{.Name}}"
 
CONTAINER           CPU %               MEM USAGE / LIMIT     NET I/O             NAME
62be266217e3        0.00%               1.793MiB / 15.39GiB   2.34GB / 1.95GB     vps12.com_nginx_1
21f986581173        0.00%               5.543MiB / 15.39GiB   16.9kB / 0B         vps12.com_php54_1
f4a2f0111178        0.00%               6.48MiB / 15.39GiB    16.9kB / 0B         vps12.com_php56_1
d984db8a9615        0.00%               19.55MiB / 15.39GiB   2.31GB / 2.66GB     vps12.com_php72_1
dcd9e311a1f0        0.20%               443.4MiB / 15.39GiB   1.77GB / 2.68GB     vps12.com_mysql_1
21c1f6fccf9c        0.15%               34.99MiB / 15.39GiB   7.49GB / 11.9GB     vps12.com_redis_1

各个占位符的含义:
.Container – 显示容器ID;
.Name – 显示容器名称;
.ID – 显示容器ID;
.CPUPerc – 显示CPU百分比;
.MemUsage – 显示内存使用情况;
.NetIO – 显示网络I / O;
.BlockIO – 显示块I / O;
.MemPerc – 显示内存百分比;
.PID – 显示进程ID的数量;

分类: Linux, 软件使用 标签: ,

CentOS 一键安装Cacti 1.2.3脚本

2019年5月19日 没有评论
1
2
3
4
5
6
7
8
9
10
11
12
13
14
15
16
17
18
19
20
21
22
23
24
25
26
27
28
29
30
31
32
33
34
35
36
37
38
39
40
41
42
43
44
45
46
47
48
49
50
51
52
53
54
55
56
57
58
59
60
61
62
63
64
65
66
67
68
69
70
71
72
73
74
75
76
77
78
79
80
81
82
83
84
85
86
87
88
89
90
91
92
93
94
95
96
97
98
99
100
101
102
103
104
105
106
107
108
109
110
111
112
113
114
115
116
117
118
119
120
121
122
123
124
125
126
127
128
129
130
131
132
133
134
135
136
137
138
139
140
141
142
143
144
145
146
147
148
149
150
151
152
153
154
155
156
157
158
159
160
161
162
163
164
165
166
167
168
169
170
171
172
173
174
175
176
177
178
179
180
181
182
183
184
185
186
187
188
189
190
191
192
193
194
195
196
197
198
199
200
201
202
203
204
205
206
207
208
209
210
211
212
213
214
215
216
217
218
219
220
221
222
223
224
225
226
227
228
229
230
231
232
233
234
235
236
237
238
239
#!/bin/bash
 
echo "this script requires git"
yum install -y git 
 
echo "This script will download all Cacti dependecies and download the chosen cacti version from the cacti github"
echo "Dont forget to support cacti @ cacti.net!"
 
echo "set selinux to disabled"
setenforce 0 
sed -i 's/enforcing/disabled/g' /etc/selinux/config /etc/selinux/config
 
#Download chosen release
echo "here are some of the current cacti release versions \n
release/1.2.3
release/1.2.2
release/1.2.1
release/1.2.0
"
 
echo  "which release would you like to download ? Hit enter for latest"
read version
 
if  [ "$version" == "" ]
then
git clone https://github.com/Cacti/cacti.git
 
else 
yum install -y wget unzip
wget https://github.com/Cacti/cacti/archive/release/$version.zip
unzip $version 
mv cacti-release-$version cacti
fi
 
echo "will you be using the spine poller enter 1 for yes 2 for no"
read answer
if [ $answer == "1" ]
then
##Download packages needed for spine
yum install -y gcc mysql-devel net-snmp-devel autoconf automake libtool dos2unix help2man
echo "downloading and compling spine"
git clone https://github.com/Cacti/spine.git
cd spine
./bootstrap
./configure
make
make install
chown root:root /usr/local/spine/bin/spine
chmod u+s /usr/local/spine/bin/spine
cd ..
 
else
echo "spine dependecies  will not be installed"
fi
 
echo "On Centos systems we need to enable EPEL repos"
yum install http://rpms.remirepo.net/enterprise/remi-release-7.rpm -y
yum install yum-utils -y
yum-config-manager --enable remi-php72
 
echo "Downloading PHP modules needed for Cacti install"
 
yum install  -y rrdtool mariadb-server net-snmp-utils net-snmp  snmpd php php-mysql  php-snmp php-xml php-mbstring php-json php-gd php-gmp php-zip php-ldap php-mc php-posix 
 
###Start services 
 
systemctl enable httpd
systemctl enable mariadb
systemctl start mariadb
systemctl start httpd
 
####Open Port 80 and 443 on firewalld
 
echo "Open http and https ports on firewalld"
firewall-cmd --zone=public --add-port=80/tcp --permanent
firewall-cmd --zone=public --add-port=443/tcp --permanent
firewall-cmd --reload
 
##Timezone settings needed for cacti
echo "Enter your PHP time zone i.e America/Toronto  Default is US/Central "
read timezone
if [ $timezone == "" ] 
then
 
echo "date.timezone =" US/Central >> /etc/php.ini
else
 
echo "date.timezone =" $timezone >> /etc/php.ini
 
fi  
 
echo "Where would you like to install cacti default location is /var/www/html hit enter for default location"
read location
if [$location = ""]
then
 
location="/var/www/html"
 
mv cacti /var/www/html
else
mv cacti $location
fi
 
#Create cacti user and change permission of directory
echo "Which user would you like to run Cacti under (Default is www-data) hit enter for default"
read user
if [$user = ""]
then 
user="apache"
echo  "cacti will be run under apache"
chown -R  apache:apache $location/cacti
else 
useradd $user
chown -R $user:$user $location/cacti
fi
 
#assign permissions for cacti installation
 
chown -R apache:apache $location/cacti/resource/snmp_queries/          
chown -R apache:apache $location/cacti/resource/script_server/
chown -R apache:apache $location/cacti/resource/script_queries/
chown -R apache:apache $location/cacti/scripts/
chown -R apache:apache $location/cacti/cache/boost/
chown -R apache:apache $location/cacti/cache/mibcache/
chown -R apache:apache $location/cacti/cache/realtime/
chown -R apache:apache $location/cacti/cache/spikekill/
touch $location/cacti/log/cacti.log
chmod 777 $location/cacti/log/cacti.log
chown -R apache:apache   $location/cacti/log/
cp $location/cacti/include/config.php.dist $location/cacti/include/config.php
 
##Create database 
echo "would you like to customize the database name and user ? hit enter for defaults"
read customize
 
if [[ $customize = "" ]] 
then
 
mysql -uroot <<MYSQL_SCRIPT
CREATE DATABASE cacti DEFAULT CHARACTER SET utf8 COLLATE utf8_unicode_ci ;
GRANT ALL PRIVILEGES ON cacti.* TO 'cacti'@'localhost' IDENTIFIED BY 'cacti'; ;
GRANT SELECT ON mysql.time_zone_name TO cacti@localhost;
USE mysql;
ALTER DATABASE cacti CHARACTER SET utf8mb4 COLLATE utf8mb4_unicode_ci;
FLUSH PRIVILEGES;
MYSQL_SCRIPT
 
#pre populate cacti db
mysql -u root  cacti < $location/cacti/cacti.sql
mysql_tzinfo_to_sql /usr/share/zoneinfo | mysql -u root  mysql
 
sed -i -e 's@^$database_type.*@$database_type = "mysql";@g' /var/www/html/cacti/include/config.php
sed -i -e 's@^$database_default.*@$database_default = "cacti";@g' /var/www/html/cacti/include/config.php
sed -i -e 's@^$database_hostname.*@$database_hostname = "127.0.0.1";@g' /var/www/html/cacti/include/config.php
sed -i -e 's@^$database_username.*@$database_username = "cacti";@g' /var/www/html/cacti/include/config.php
sed -i -e 's@^$database_password.*@$database_password = "cacti";@g' /var/www/html/cacti/include/config.php
sed -i -e 's@^$database_port.*@$database_port = "3306";@g' /var/www/html/cacti/include/config.php
sed -i -e 's@^$database_ssl.*@$database_ssl = "false";@g' /var/www/html/cacti/include/config.php
sed -i -e 's@^//$url_path@$url_path@g' /var/www/html/cacti/include/config.php
 
echo "default database setup with following details"
echo "database name cacti\n
database username cacti\n
database password cacti"
 
else
 
echo "enter db name"
read customdbname
echo "enter db user"
read customdbuser
echo "enter db password"
read customdbpassword
 
mysql -u root <<MYSQL_SCRIPT
CREATE DATABASE $customdbname;
GRANT ALL PRIVILEGES ON $customdbname.* TO '$customdbuser'@'localhost' IDENTIFIED BY '$customdbpassword';
GRANT SELECT ON mysql.time_zone_name TO $customdbuser@localhost;
ALTER DATABASE $customdbname CHARACTER SET utf8mb4 COLLATE utf8mb4_unicode_ci;
FLUSH PRIVILEGES;
MYSQL_SCRIPT
 
echo "Pre-populating cacti DB"
mysql -u root  $customdbname < $location/cacti/cacti.sql
mysql_tzinfo_to_sql /usr/share/zoneinfo | mysql -u root  mysql
 
sed -i -e 's@^$database_type.*@$database_type = "mysql";@g' $location/cacti/include/config.php
sed -i -e 's@^$database_default.*@$database_default = '$customdbname'\;@g' $location/cacti/include/config.php
sed -i -e 's@^$database_hostname.*@$database_hostname = "127.0.0.1";@g' $location/cacti/include/config.php
sed -i -e 's@^$database_username.*@$database_username = '$customdbuser';@g' $location/cacti/include/config.php
sed -i -e 's@^$database_password.*@$database_password = '$customdbpassword';@g' $location/cacti/include/config.php
sed -i -e 's@^$database_port.*@$database_port = "3306";@g' "$location"/cacti/include/config.php
sed -i -e 's@^$database_ssl.*@$database_ssl = "false";@g' "$location"/cacti/include/config.php
sed -i -e 's@^//$url_path@$url_path@g' $location/cacti/include/config.php
 
fi
 
###Adding recomended PHP settings 
sed -e 's/max_execution_time = 30/max_execution_time = 60/' -i /etc/php.ini
sed -e 's/memory_limit = 128M/memory_limit = 400M/' -i /etc/php.ini
 
echo "Applying recommended DB settings"
echo "
innodb_file_format = Barracuda
character_set_client = utf8mb4
max_allowed_packet = 16777777
join_buffer_size = 32M
innodb_file_per_table = ON
innodb_large_prefix = 1
innodb_buffer_pool_size = 250M
innodb_additional_mem_pool_size = 90M
innodb_flush_log_at_trx_commit = 2
" >> /etc/my.cnf.d/server.cnf
 
echo "this script can download the following plugins monitor,thold would you like to install them  ?
type yes to download hit enter to skip"
read plugins
 if [ $plugins == "yes" ]
  then
   git clone https://github.com/Cacti/plugin_thold.git
    git clone https://github.com/Cacti/plugin_monitor.git
mv plugin_thold thold
  mv plugin_monitor monitor
   chown -R $user:$user thold
    chown -R $user:$user monitor
     mv thold $location/cacti/plugins
      mv monitor $location/cacti/plugins
else
 echo "plugins will not be installed"
fi
 
touch /etc/cron.d/$user
echo "*/5 * * * * $user php $location/cacti/poller.php > /dev/null 2>&1" > /etc/cron.d/$user 
 
echo "refreshing services"
systemctl restart httpd
systemctl restart mariadb
 
echo "Installation completed !"
分类: Linux, 编程实践 标签: , ,

centos7 firewall-cmd

2019年4月4日 没有评论
1
2
3
4
5
6
7
8
9
10
11
12
13
14
15
16
17
18
19
20
21
22
23
24
25
26
27
28
#删除端口规则
firewall-cmd --zone=public --remove-port=22/tcp --permanent
 
#查看列表规则
firewall-cmd --zone=public --list-ports
 
#开设端口
firewall-cmd --zone=public --add-port=22/tcp --permanent
firewall-cmd --zone=public --add-port=80/tcp --permanent
firewall-cmd --zone=public --add-port=443/tcp --permanent
 
firewall-cmd --reload
systemctl enable firewalld
systemctl restart firewalld
 
#限制指定ip地址访问端口,例如ssh端口22
firewall-cmd --permanent --add-rich-rule="rule family="ipv4" source address="192.168.11.11" port protocol="tcp" port="22" accept"
 
#删除限制规则
firewall-cmd --permanent --remove-rich-rule="rule family="ipv4" source address="192.168.11.11" port protocol="tcp" port="11300" accept"
 
#开通端口范围规则
firewall-cmd --permanent --add-port=1000-2000/tcp
 
#添加指定网段对ssh所用的端口访问权限
firewall-cmd --permanent --add-rich-rule="rule family="ipv4" source address="112.112.112.0/24" port protocol="tcp" port="22" accept"
 
#以上是一些实用新版本防火墙笔记,希望对大家有用

CentOS7使用firewalld打开关闭防火墙与端口

2019年3月10日 没有评论

1、firewalld的基本使用
启动: systemctl start firewalld
关闭: systemctl stop firewalld
查看状态: systemctl status firewalld
开机禁用 : systemctl disable firewalld
开机启用 : systemctl enable firewalld

2.systemctl是CentOS7的服务管理工具中主要的工具,它融合之前service和chkconfig的功能于一体。
启动一个服务:systemctl start firewalld.service
关闭一个服务:systemctl stop firewalld.service
重启一个服务:systemctl restart firewalld.service
显示一个服务的状态:systemctl status firewalld.service
在开机时启用一个服务:systemctl enable firewalld.service
在开机时禁用一个服务:systemctl disable firewalld.service
查看服务是否开机启动:systemctl is-enabled firewalld.service
查看已启动的服务列表:systemctl list-unit-files|grep enabled
查看启动失败的服务列表:systemctl –failed

3.配置firewalld-cmd

查看版本: firewall-cmd –version
查看帮助: firewall-cmd –help
显示状态: firewall-cmd –state
查看所有打开的端口: firewall-cmd –zone=public –list-ports
更新防火墙规则: firewall-cmd –reload
查看区域信息: firewall-cmd –get-active-zones
查看指定接口所属区域: firewall-cmd –get-zone-of-interface=eth0
拒绝所有包:firewall-cmd –panic-on
取消拒绝状态: firewall-cmd –panic-off
查看是否拒绝: firewall-cmd –query-panic

那怎么开启一个端口呢
添加
firewall-cmd –zone=public –add-port=80/tcp –permanent (–permanent永久生效,没有此参数重启后失效)
重新载入
firewall-cmd –reload
查看
firewall-cmd –zone= public –query-port=80/tcp
删除
firewall-cmd –zone= public –remove-port=80/tcp –permanent

分类: Linux 标签: , ,